Oct 30, 2013

Smaragdna košulja / An emerald shirt

Konačno imam i slike košulje o kojoj sam pisala prošle nedelje. Poslužila je kao dobar materijal za par tutorijala.
Košulja je napravljena od divnog pamučnog puplina, koji sam kupila po neverovatno niskoj ceni (kako volim kad mi se to desi!). Boja materijala me ponajviše privukla - mešavina pertrolej i smaragdno zelene smaragdnozelene (naučih od Milje nešto novo o srpskom pravopisu), prelepa!
Smišljala sam kako bih mogla najbolje da iskoristim svoj materijal, i lomila se između košulje i letnje haljine, ali sam shvatila da mi je nova košulja mnogo potrebnija.

I can finally show you pictures of an emerald shirt I wrote about last week. It served as a nice material for several tutorials.
The shirt is made of a gorgeous cotton poupline that I bought for really cheap (oh how I love when this happens!). I was drawn to it by the color - a mixture of an emerald and petrol green, just gorgeous! I've been thinking of how to utilize the fabric and was in doubt between making a shirt or a summer dress, but I realized I needed a shirt more than a dress.


Osnova za bluzu je kroj od koga ne odustajem - Burda 1/2008 #108. Ponekad samu sebe iznenadim novim varijacijama koje ovaj kroj može da iznedri. Ideja za ovu bluzu nije preterano originalna, sličnu sam napravila davno, koristeći kroj iz španskog časopisa Patrones. Originalna bluza mi je zadala par glavobolja, jer je kroj ispao prilično velik i morala sam dosta da ga korigujem kako bih spasila bluzu. Kasnije sam, tako korigovan kroj koristila još par puta, ali sam primetila da šav koji spaja gornje i donje panele prednjice stoji previsoko preko grudi, što prilično čudno igleda. Zato reših da iznova prekrojim svoj omiljeni kroj i napravim repliku već pomenute košulje.

A basis for the shirt is the pattern I've been using over and over again - BWOF 1/2008 #108. I surprise myself sometimes with the endless variations that come from this pattern. The idea for the blouse was not a very original one, I made a similar blouse ages ago, using a pattern from the Spanish Patrones magazine. The original blouse gave me a headache, since the pattern turned out too big and I had to tweak it a lot in order to save the blouse. Later on, I used the altered pattern few more times, but I've noticed that the horizontal seam joining the upper and lower panels sits to high over my breast, which looks kind of awkward. So I decided to redraft my favorite pattern once again and make a replica of the mentioned blouse.


Prednji donji paneli su najpre nafaltani sitnim falticama, a potom ukoso iskrojeni tako da faltice formiraju šaru riblje kosti. Gornji bočni paneli su blago prošireni kako bih mogla da ih naberem ispod grudi.

The bottom front panels were pleated first with tiny pintucks, and then cut on bias so that the pintucks form a chevron motif. The top side panels were altered a bit in order to make gathers under bust.


Kragnu i manžetne sam takođe iskrojila od nafaltanog materijala, pri čemu se motiv riblje kosti ponavlja na kragni, dok su na manžetnama faltice postavljene vodoravno.

The collar and cuffs were also cut from the pleated fabric, repeating the chevron motif on the collar. The pintucks were laid horizontally on the cuffs.


Neverovatno kako jedna jednobojna košulja ume da zada problem prilikom kombinovanja sa ostalom garderobom. Ovaj put sam je uparila sa teget suknjom, ali sam kupila još par materijala za suknje, koje planiram da nosim sa ovom bluzom. Jedna od njih je skoro gotova, tako da možete uskoro da očekujete novi post.

It's amazing how a plain shirt can be difficult to match with the rest of one's wardrobe. This time I paired it with a navy skirt, but I bought few more fabrics for skirts that I plan to wear with the shirt. One of the skirts is almost finished, so you can expect a new post about it soon.

U međuvremenu, evo par tehnika koje sam koristila prilikom šivenja košulje. Klik na sliku odvešće vas do odgovarajućih instrukcija.

Meanwhile, here are some of the techniques I used while sewing the shirt. Click on the picture will take you to the corresponding tutorial post.


Oct 28, 2013

Pačvork jastučići / Patchwork cushions

Nedavno sam dobila dva jastučeta kojima su trebale lepe jastučnice da bi krasili moj kauč. Pošto je kauč jednobojan, reših da ga osvežim šarenim jastučićima u pačvork tehnici. Inače, jako volim pačvork, i uživam u samom procesu sastavljanja šarenih delića u celinu, ali često imam problem da uklopim stvari rađene ovom tehnikom sa ostatkom nameštaja u stanu. Velike površine su mi često previše šarene ili previše rustičnog izgleda za moj ukus, tako da sam do sada izbegavala da pravim pokrivače ili prekrivače za svoj stan. Onaj par prekrivača što sam napravila se divno uklopio u kuću na selu, koja je sva u etno - rustičnom stilu.

Recently I got a couple of cushions that needed pillowcases so I could put them on my couch. Since the couch is in plain color, I thought some colorful patchwork cushions would go well with it. I really like patchwork and I enjoy in process of making a whole out of numerous pieces, but I often have a problem with combining the patchworked items with the rest of my furniture. Big patchworked surfaces are usually too colorful or too rustic for my liking so I've avoided to make quilts for my apartment. The set of quilts I made earlier fit beautifully in our country house, which is all decorated in etno-rustic style.

Uglavnom, za jastučiće sam koristila ostatke materijala koji su ostali od žuto - maslinastog kaputa, kao i maslinasto - bež pepito materijal koji je ostao od nekih pantalona koje sam davno šila. Hehe, zamislite kako bi smešno bilo da u kaputu sednem na kauč i stopim se s njim! U svakom slučaju, boje su se odlično uklopile i međusobno, a i sa mojim kaučem. Takođe, jastučići imaju taman dovoljno boje da malo ožive kauč, a opet nisu ni rustični ni prešareni. Prava mera za moj ukus.

Anyways, I used remnants from the yellow - olive coat and some beige - olive houndstooth wool that was a remnant from a pair of pants I made ages ago. Hehe, imagine how hilarious it would be for me to sit on the couch wearing the coat and blend wit the pillows! The colors matched well with each other as well as with the coach. The cushions are colorful enough to add some light to the couch, yet not rustic nor overwhelming for my liking.


Zadnji deo jastuka je napravljen od pepito materijala.

The back side is made from the houndstooth fabric.


Oct 24, 2013

Anita Mei magazin - peti broj / Anita Mei magazine - the fifth issue


Dragi čitaoci, imam zadovoljstvo da vas obavestim da sam počela da sarađujem sa još jednim časopisom o šivenju. Ovaj put, u pitanju je domaći magazin, pod nazivom Anita Mei, koji vodi tim od četiri veoma zanimljive mlade žene: Maja Urošević, Bojana Urošević, Aleksandra Gavrilović i Bojana Draganić. Zanimljivo je da je magazin u web izdanju i besplatan je! Posetite blog Anita Mei, gde možete naći i arhivu prethodnih brojeva, a peti broj možete pogledati ovde.

Dear readers, I am thrilled to inform you I've started a collaboration with another sewing magazine. This time, it's a Serbian magazine, called Anita Mei, lead by a team of four very interesting young women: Maja Urosevic, Bojana Urosevic, Aleksandra Gavrilovic and Bojana Draganic. What's interesting is that the magazine is in a web format and free of charge! Visit Anita Mei blog (which is in Serbian), where you can find archive of the previous issues of the magazine, and you can read the fifth issue of the magazine here (the magazine is also in Serbian but it's heavily illustrated with lots of photograpghs).


Do devojaka iz tima sam došla neverovatnim spletom okolnosti, tj. po preporuci udruženja Kreiranje uspeha, koje je izgleda osetilo da imamo dobar potencijal za saradnju. Ubrzo sam kontaktirala uredništvo časopisa, i brzo smo shvatile da je nova saradnja na pomolu.

I was introduced to the team quite unexpectedly, by a local society dedicated to inspiring and educating people to succeed in their lives, which I guess felt the team and I had a nice potential for a collaboration. Soon afterwards I contacted the editor of the magazine and a new collaboration was born.


Anita Mei je relativno mlad magazin - izdato je tek pet brojeva, ali sam ubeđena da je pred njim dug, uspešan put. Poslednji u nizu, peti broj, sadrži dva moja članka, u rubrikama "Mala škola detalja" - u kojoj postupno uvodimo novajlije u šivenju u naš kreativni svet i "Projekat" - gde dajemo detaljna uputstva za šivenje raznorazne garderobe.  Pored pomenutih članaka, pojavljujem se još i u rubrici "Galerija", gde su prikazana dva moja modela - predivna tirkizna haljina koju sam šila drugarici, i moja nova suknja na falte (o kojoj će tek biti reči uskoro).

Anita Mei is a rather young magazine - only five issues have been published so far, but I'm convinced it's destined to succeed. The last, fifth issue of the magazine contains two of my articles: "A school of details" - where sewing beginners are gradually introduced to the creativity of sewing, and "Project" - where we give detailed instructions for sewing various types of garments. Along with these articles, I also appear in the section "Gallery", which features two of my creations - the beautiful turquoise dress I made for a friend and a new pleated skirt I made for myself (more about the skirt soon).


Već smo dobili dosta pozitivnih komentara na račun novog broja, pa se nadamo da će se i vama dopasti. U međuvremenu, aktivno radimo na pripremi novog, šestog broja.

We've already gotten a lot of positive feedback and hope people will like this issue, Meanwhile we're preparing a new, sixth issue for November.

Oct 22, 2013

Šivenje manžetne rukava na bluzi / Sewing a sleeve cuff on a blouse


Evo još jednog, kratkog tutorijala, kojim ćemo kompletirati priču o šlicu na rukavu bluze. Kada je šlic obrađen, rukav treba prošiti duž bočnih šavova, tako da formira "cilindar".
Kroj za manžetne je u osnovi pravougaonik (koji može imati blage varijacije, zavisno od detalja - na primer, zaobljene ivice), par santimerata širi od obima ručnog zgloba, i duplo duži od potrebne dužine gotove manžetne. Pošto sam za lice manžetne koristila nafaltani materijal, ja sam svoje manžetne spajala od dva materijala. Flizelin nalepiti na naličje materijala, i to na onaj deo manžetne koji će biti na licu košulje - u mom slučaju, na nafaltani deo.

Here's another short tutorial, which will complete the story about the sleeve slit on a blouse. Once the slit is finished, the sleeve should be sewn along the side seams, so that it forms a tube.
The sleeve cuffs' pattern is a rectangle (which could have some slight variations, depending on details - for example, rounded ends), that's a few centimeters wider than the circumference of your wrist, and twice as long as the finished cuff. Since I used the fabric with pintucks for the upper layer of the cuffs, I joined two fabrics to get the basis of the cuff. I fused the interfacing to the wrong side of the fabric, to the upper cuff's layer.


Saviti manžetnu na pola po dužini, pa prošiti bočne šavove. Stanjite dodatke za šavove na oko 5 mm. Izvrnite manžetne na lice i prepeglajte ih dobro.

Fold the cuff along it's length and sew the side seam. Cut off the SAs. Flip the cuffs inside out and press them well.


Kada prišivate manžetnu, najpre prišijte donji, unutrašnji sloj, za rukav - postavite lice materijala manžetne na naličje rukava. Najpre poravnajte ivice manžetne i šlica rukava, pa zatim i ostatak dužine. Primetite da je obim rukava širi od manžetne, pa je potrebno napraviti faltu na rukavu, prateći oznake na kroju.
Kada ste prišili donji sloj manžetne, prepeglajte materijal, peglajući sa naličja rukava, a u smeru od rukava ka manžetni, tako da se prošiveni šav potpuno ispresuje.

When attaching the cuff to the sleeve, sew the lower cuff's layer to the sleeve first - place the right side of the cuff to the wrong side of the sleeve. Align the cuff's ends with the sleeve slit's ends first and then align the rest of the length. Note that circumference of the sleeve is greater than the cuff's width, so make a pleat on the sleeve, following the pleat notches on the sleeve pattern.
Once the lower layer of the cuff is attached, press the sleeve, ironing in a direction from the sleeve towards the sleeve cuff.


Sada pažljivo presavijte spoljni sloj manžetne na unutra, tako da pregib prekriva prethodno napravljen šav. Špenadlama pričvrstite slojeve materijala. Opet, prilikom rada, krenite prvo od ivica šlica rukava, pa se pomerajte ka sredini.
Proštepajte manžetnu, vodeći štep tik uz ivicu pregiba tkanine. Prepeglajte manžetnu i rukav još jednom.

Carefully fold the upper layer of the cuff inwards, so that the fold line covers the previously made stitch. Pin the fabrics in place. Again, when working, start from the cuff's ends and continue towards the center.
Topstitch the cuff by stitching as close as possible to the fold line. Press the sleeve and the cuff once again.


Sada je rukav spreman da se spoji sa ostatkom košulje.

The sleeves are now ready to be sewn to the bodice of the blouse.

Oct 21, 2013

Kako obraditi šlic na rukavu bluze / How to finish a sleeve slit on a blouse


Danas ću vam pokazati kako se obrađuje šlic na rukavu bluze. Ovaj tutorijal nije novina u svetu krojaških blogera, ali ni jedan nisam imala prilike da vidim na sprskom jeziku, pa pomislih kako ne bi bilo na odmet da napišem instrukcije.

I'll show you how to finish a sleeve slit on a blouse. The technique is not a novelty in the sewing blogosphere, but I haven't had a chance to see any similar tutorials written in Serbian, so I thought it wouldn't hurt to write down the instructions.

Dakle, obeležite šlic na rukavu, premerite ga i iskrojte trakicu sledećih dimenzija:
  • širina: 4 cm
  • dužina: dužina šlica x 2 + 2-3 cm
Traku možete iskrojiti paralelno sa pravcem tkanja matarijala, ili pod uglom od 45 stepeni. Ako koristite prugasti materijal, kosa traka će imati veoma zanimljiv efekat.

So, mark the slit line on the sleeve. Measure the slit and cut a strip of fabric with the following dimensions:

  • width: 4 cm
  • length: slit lengthx 2 + 2-3 cm

You can cut the strip on straight grain or on bias. If you're using a striped fabric, a bias cut strip would add some drama to your shirt.


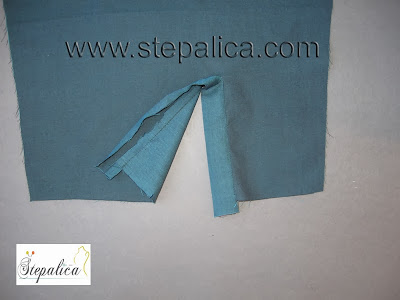
Isecite šlic duž iscrtane linije, pa se zaustavite na oko 5 mm od temena duži. Odatle secnite materijal dijagonalno ka temenima oznake šlica, vodeći računa da ne prosečete tkaninu dalje od krajnjih tačaka.

Cut the slit along the marked line, stopping the cutting approximately 5 mm away from the end of the line. Make diagonal cuts towards the endpoints of the slit, making sure you don't cut further from these points.


Postavite lice trakice na naličje rukava, poravnavajući njenu ivicu sa ivicom šlica. Pričvrstite tkanine špenadlama.

Lay the right side of the strip along the wrong side of the sleeve, aligning the raw edges. Pin the fabrics in place.


Otvorite šlic tako da formira pravu liniju, pa poravnajte ivice materijala celom dužinom. Proštepajte slojeve zajedno, vodeći računa da šav prolazi tik uz ćoškove šlica.

Open the slit so that it forms a straight line, and align it with the strip along it's length. Sew the fabrics together, making sure you sew next to the slit's endpoints.


Savijte slobodnu ivicu trakice na unutra, paveći pregib na 5 mm od ivice. Prepeglajte pregib. Prošivenu ivicu trakice prepeglajte tako da je šav lepo ispresovan.

Fold the free edge of the strip by 5 mm and press the fold line. Press to the side the sewed edge of the slit.


Savijte trakicu preko lica rukava, tako da pregib slobodne ivice prekriva prethodno napravljen štep. Pričvrstite slojeve materijala šenadlama.

Fold the strip over the right side of the fabric, so that the strip covers the previously made stitch. Pin the layers together.


Proštepajte duž slobodne ivice trakice, postavljajući štep tik uz ivicu pregiba.

Topstitch the strip, sewing right next to the fold line.


Otsecite krajeve trakice koji štrče sa rukava. 
Spojte i poravnajte ivice šlica, postavljajući lice ka licu, pa napravite dijagonalni štep, koji spaja teme šlica sa ivicama.

Cut off the extra fabric from the strip.
Align the sleeve legs together, placing them with right sides together. Make a diagonal stitch, connecting the end point of the slit with its edge lines.


Preklopite delove rukava kao što je prikazano na slici, pa ga preleglajte.. Sada možete da spojite bočne šavove rukava, a potom i da prišijete manžetnu.

Lay the sleeve as shown on the picture and press it well. Your sleeve is now ready for sewing it along the side seams and for attaching a sleeve cuff.


Oct 15, 2013

Šivenje sitnih faltica / Sewing tiny pintucks


Tokom vikenda sam šila novu košulju. Poželeh da ponovim detalj sa davno napravljene bluze, koji kombinuje sitne faltice i šaru riblje kosti. Faltice su ručno pravljene, jedna po jedna, pa pomislih kako ne bi bilo loše da vam pokažem kako se iste šiju. Postupak nije težak, ali je spor i prilično monoton, tako da zahteva strpljenje i, naravno, malo preciznosti.

I was working on a new shirt this weekend. I wanted to copy a detail I made on a blouse that I sewed years ago, which combines tiny pintucks and chevron pattern. The pintucks are hand made, one at the time, so I thought it would bi nice to show you how to make them. The technique is not difficult, but it's time consuming and rather monotonous, so it requires patience and, off course, some precision.

Dakle, pripremite alat koji ćete koristiti: lenjir ili krojački metar, fino naoštrenu kredu u kontrastnoj boji u odnosu na vaš materijal i špenadle.
Isecite traku materijala, bar 5 cm dužu od dužine krojnih delova (pošto sam krojne delove sekla ukoso, ja sam dodala 15 cm na potrebnu dužinu) i bar 10 cm širu od širine koja će vam inače trebati za krojenje krojnih delova. Primera radi, ja sam iskrojila traku širine 140 cm i dužine 40 cm - to je bilo dovoljno za iskrajanje prednjih panela košulje (paneli idu od ispod grudi do poruba košulje), jedan sloj kragne i manžetne.

Prepare the tools you'll need: a ruler or a measuring tape, a sharpened chalk in a contrasting color and pins.
Cut a strip of fabric, at least 5 cm longer than the pattern (since I cut the shirt panels on bias, I added 15 cm to the pattern length) and at least 10 cm wider than the width you'd normally need for cutting your pattern pieces. As a reference, I cut a strip of fabric 140 cm wide and 40 cm long - this was enough to cut front shirt panels on bias (the panels are 30 cm long), one layer of collar and sleeve cuffs.


Obeležite ravnomerne razmake duž gornje i donje ivice materijala. Ja sam oznake postavljala na svaka 2 cm, ali vi možete birati gustinu faltica prema vašem ukusu. Bitno je da duži koje spajaju gornju i donju ivicu materijala budu paralelne međusobno, kao i sa pravcem tkanja materijala.
Savet: ukoliko ste otsekli poduži komad materijala (na primer, 60 cm i duži), obeležite još jedan niz oznaka, otprilike na sredini dužine materijala.

Mark equidistant notches along the top and bottom edge of the fabric. I made the marks on every 2 cm, but you can choose the density of the pintucks according yo your liking. What's important is that the lines connecting the notches have to be mutually parallel and on grain.
Tip: if your strip of fabric is long (for example, 60 cm or longer), make one more row of notches, somewhere at the middle of the fabric's length.


Presavijte materijal po dužini, prateći oznake na gornjoj i donjoj ivici materijala. Špenadlama pričvrstite materijal najpre u krajnjim tačkama, zatim lepo zategnite materijal kako bi se pregib što više definisao, pa uhvatite špenadlama i sredinu materijala.

Fold the fabric along its length, following the notches on top and bottom edge. Pin the fabric first in end points, tighten the fabric to define the fold line and pin the fabric at the center.


Proštepajte materijal, postavljajući štep i iglu tik uz ivicu pregiba. Na slici ispod možete videti kako je materijal postavljen u odnosu na papučicu. Pri tom, obratite pažnju na to da je igla na mojoj mašini pomerena u krajnji desni položaj.
Savet: Ukoliko ne možete da pomerate položaj igle na vašoj mašini, predlažem da na ubodnoj pločici napravite oznaku (ukoliko ista već ne postoji), koja će predstavljati graničnik postavljanja materijala. U ovu svrhu možete koristiti komad samolepljive trake ili papira.
Štepajte jednu po jednu falticu dok ne završite proces.

Stitch the fabric, by running the stitch and needle right next to the fold line. You can see on the picture below how I laid the fabric under the presser foot. Also, note that I positioned the needle in the most right position.
Tip: If your machine doesn't have an option to switch the needle's position, I suggest making a positioning label on the machine that would guide your fabric. You can use an adhesive tape for this.
Sew one pintuck at time until you sew them all.


Kada ste proštepali sve faltice, prepeglajte materijal - najpre sa naličja, a zatim i sa lica tkanine, prepeglavajući sve falte u istom smeru.
Sada je materijal spreman za sečenje prema kroju koji ste odabrali.

Once all the pintucks are made, press the fabric - first from the wrong side and then from the right side, pressing all the pintucks in a one direction.
The fabric is now ready for cutting following the pattern of your choice.
  

Panele košulje sam iskrojila ukoso, kako bih formirala šaru riblje kosti, koristeći tehniku koju sam već opisala na blogu. Pošto faltice, uprkos trudu, strpljenju i preciznosti, nisu uvek savršeno paralelne i sa jednakim razmacima, uklapanje u šaru riblje kosti nije uvek savršeno, ali je rezultal svejedno lep i zanimljiv.

I cut the shirt panels on bias and arranged them to form a chevron ornament, using the technique I had already described on the blog. Since the pintucks aren't always perfectly parallel and equidistant, arranging them into chevron isn't always perfect, but the end result is equally pretty and interesting.


Na slici ispod vidite krajnji rezultat i panel koji će biti deo košulje. Post o novoj bluzi sledi uskoro!

You can see the end result on the picture below - a panel that became a part of the shirt. A post about the shirt is coming soon!


Oct 9, 2013

Šanel kaputić iz 2009. godine / A Chanel coat made back in 2009

O ovom kaputiću sam već pisala, u grubim crtama, tokom izazova Me-Made-May 2011, postove možete pročitati ovde i ovde. Kaput sam sašila 2009. godine, pre nego što sam počela da pišem blog, a nastao je tokom Go Chanel or Go Home tematskog šivenja - globalnoj "igri" u kojoj učestvuje mnoštvo ljudi, sa zadatkom da šiju određeni odevni predmet, primenjujući zadate tehnike ili vodeći se određenim propozicijama organizatora igre.  
Tokom tematskog šivenja, organizator igre i ostali iskusniji učesnici vode ostale i manje iskusne kroz sve faze šivenja, i nude mnoštvo informacija o krojačkim tehnikama, prepravkama kroja i izboru šnita i materijala. U svakom slučaju, mislim da je tematsko šivenje fenomenalan način da se nauče nove cake i isprobaju nove tehnike.
Ovakve igre sam primetila samo kod inostranih blogera, i žao mi je što u regionu ne organizujemo ništa slično. Možda je vreme da to promenimo?

I wrote before rather briefly about this coat, during the Me-Made-May 2011 challenge; you can read the related posts here and here. I made the coat back in 2009, before I started writing a blog, as part of the Go Chanel or Go Home sewalong.


Tema igre je bila Šanel jakna i šivenje iste primenom posebne tehnike koju je osmislila i lansirala Koko Šanel lično. Ova tehnika je prilično komplikovana i vremenski zahtevna, jer se mnogo šije ručno, a veoma se razlikuje od svih metoda konstrukcije jakne koje sam do tada imala prilike da vidim. U svakom slučaju, ovo je za mene bio izazov i način da naučim nešto novo (a ja baš volim da učim - ne zovu me džabe štreber!).
Tokom igre sam se prvi put oprobala i u pisanju bloga, jer su svi učesnici bili zamoljeni da podele sa drugima informacije o sebi i procesu šivenja. Sve postove igre možete pročitati ovde, a ako vas zanimaju samo moji, pratite ovaj link

Obviously, the sewalong was all about sewing a Chanel jacket, using Coco Chanel's sewing technique. The technique is rather complicated and time consuming since there's a lot of hand sewing and it differs a lot from other jacket construction techniques I had a chance to see before. Anyway, this was a great challenge for me and a great way to learn something new (and I love learning, I'm such a nerd!).
During the sewalong I tried blogging for the first time, since all the participants were asked to write about themselves and to document the sewing process. You can read all the posts of the sewalong here, and if you're interested to read just mine, follow this link.


Danas ću ukratko opisati moj proces šivenja, od izbora kroja i materijala, do samog završetka kaputa. 
Zapala su mi bila za oko dva kroja iz Burde, prikazana na slikama ispod.

I'll briefly describe the sewing process, from pattern and fabric choice to finishing the coat.
Two BWOF pattern caught my eye, shown on the pictures below.

BWOF 8/2006, #108C

BWOF 10/2005, #116

Ja sam krojeve ukombinovala u novi, prikazan na slici ispod. Koristila sam kao osnovu kroj za kaput, iz Burde 10/2005, i promenila ga tako da odgovara crtežu.

I combined the two patterns into a new one, displayed on the sketch below. I used the coat pattern from BWOF 10/2005 as a base and altered it to match the sketch.


Šanel tehnika zahteva korišćenje buklea za jaknu i lagane svile za postavu. Naravno, ukrasna traka po obodu jakne i rukava je zaštitni znak Šanela. Ja sam, umesto buklea, koristila neki materijal koji sam imala na zalihama, koji je navodno bio vuneni. Kasnije sam otkrila da materijal ima dosta sintetike u sebi, i da nije baš najbolji izbor za Šanel tehniku. Zato je na kraju moj kaput sašiven korišćenjem klasične tehnike konstrukcije jakni i kaputa, umesto Šanel tehnike, ali sam, čitajući uputstva ostalih učesnika ipak mnogo naučila! Ukrasna traka je od pletene vune, i koštala me je kao Svetog Petra kajgana :). Ali, toliko je bila lepa i tako se dobro uklopila sa materijalom, da nisam mogla da joj odolim.

The Chanel technique asks for boucle on the shell and light silk for the lining. And, off course, the trim band along the jacket's edges. Instead of boucle, I used a fabric I had in my stash, that was supposedly wool. Later I discovered the fabric had a lot of synthetic fibers in it and it wasn't a good choice for the Chanel technique. Therefore I made the coat using the standard jacket / coat construction technique, but by reading posts and comments of other participants I learned a lot! The trim band was made of braided wool and it cost me a real fortune, but it was gorgeous and matched the fabric so well I just couldn't resist it.


Svi delovi kaputa su ojačani lepljivim platnom, koje je dalo čvrstinu inače mekom i mlitavom materijalu.

All the panels were enforced by fusible interfacing, which gave some structure to the soft fabric.


Džepovi su ručno prišiveni za kaput pre nego što je dodata postava.

The pockets were sewn on by hand before the lining was attached to the coat.


Svilena postava ima na sredini leđa veliku faltu, koja daje komociju prilikom kretanja. Ukrasna traka je ručno prišivena za obod kaputa kada je isti kompletno sašiven. Umesto dugmića, prišila sam metalne kopčice - žabice - sa unutrašnje strane kaputa.

The silk lining had a big pleat at the center back, to add more ease. The trim band was sewn on by hand once the coat was finished. Instead of buttons I used metal frogs which I sewed on by hand inside the coat.


Kaput je, iako nisam primenila Šanel tehniku, ispao odličan. U vreme kada sam ga napravila, bila sam prilično uzbuđena, jer je tada predstavljao moj najbolje sašiveni komad odeće. Mislim da sam osetila posebnu potrebu da napravim savršen kaput jer sam se našla pod lupom veoma iskusnih šnajderki, a ja sam veoma takmičarski nastrojena, i nisam htela da zaostajem za drugima. Dodatni trud sam uložila na detalje, poboljšanje kroja i na uklapanje delova, što je bila prava lekcija za mene, iako sam pre tog kaputa imala pozamašno krojačko iskustvo. Mislim da sam u poslednjih sedam godina mnogo unapredila i poboljšala svoje šivenje, a veliku zaslugu u tome imaju upravo internet i svet blogera.

Even though I didn't use the Chanel technique, the coat turned out perfect. At the time I made it I was really excited with it, since it was the best sewn garment I had ever made. I think I felt a pressure to make a perfect coat because I was surrounded by a lot of very experienced dressmakers, and as I'm very competitive I didn't want to be left behind. I paid special attention to details, fit and construction, which made me learn a lot, even though I had a solid sewing experience behind me before that. I think I have improved my sewing skills a lot in the last seven years, thanks to the internet. sewing community and bloggers.